pork binagoongan

pork binagoongan (shrimp paste with pork) is a filipino dish where you cook a meat and shrimp together. and since it is a bit in a salty side dish, you may pair it with rice and steamed vegetables! there are so many ways to cook pork binagoongan, many will add some vegetables in it already. but i'm going to make the basic way and probably fastest. the ingredients are probably something you may already have in your pantry. so let's start!

pork belly


ingredients:

  • 1 tbsp vegetable oil
  • 1/2 of a whole onion (chopped)
  • 3 gloves garlic (chopped)
  • 1 whole roma tomatoes (chopped)
  • 1 pound pork (cut into cube) you can use pork belly
  • 3 tbsp shrimp paste
  • 1/2 cup water (more if needed)
  • ground black pepper (optional)
  • garlic powder (optional)
  • green onions for toppings

directions:

  1. add vegetable oil into a heated pot
  2. saute the onion until it turns transparent
  3. add the garlic and tomatoes and cook the tomatoes until it's mushy
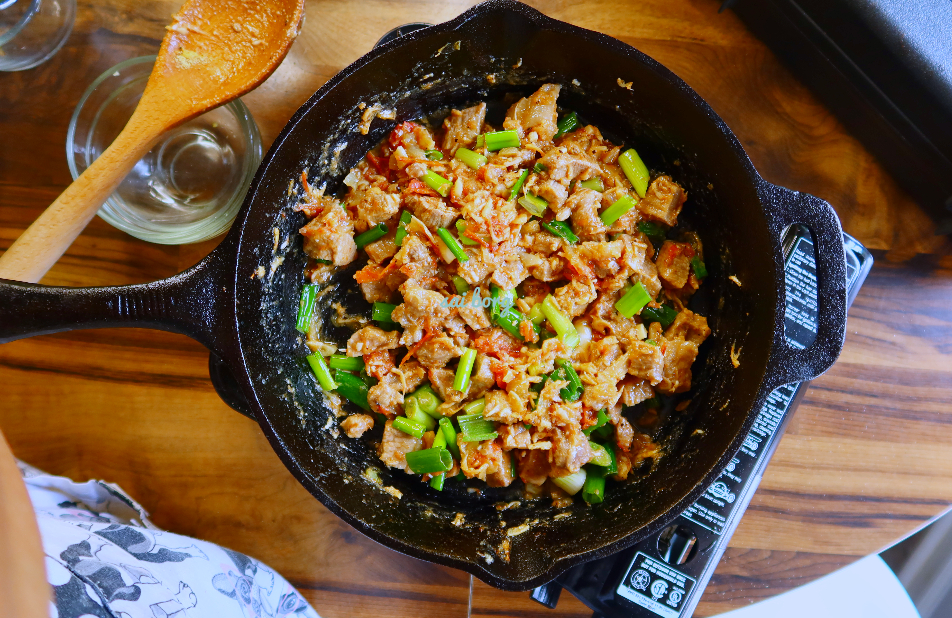
  4. add the pork and water and cover until it the pork is cooked
  5. add the shrimp paste and cook more
  6. you can add some seasonings you prefer like powdered garlic, powdered onion, black pepper,
  7. and top with green onions
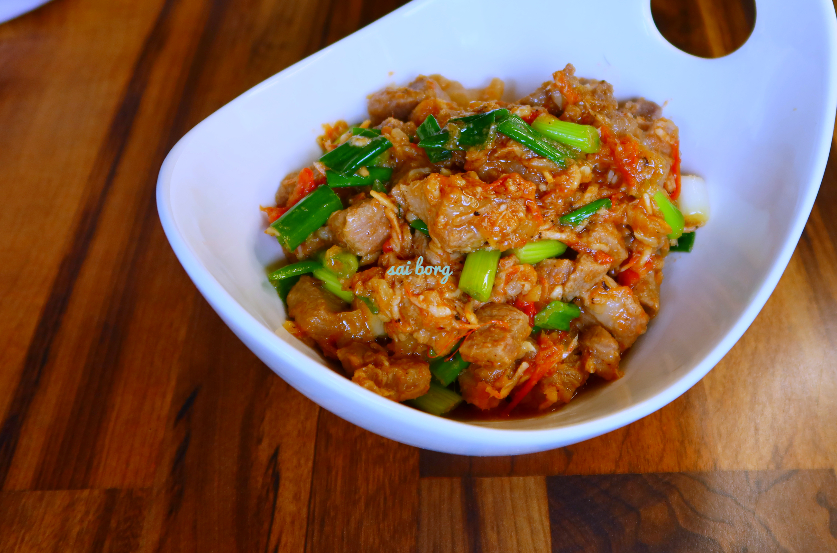
 

pork

enjoy!

love you bunches,

sai

pound cake

if you want a million dollar pound cake recipe, try this! it's so good! :P

ingredients:

  • 3 cups sugar
  • 1 pound butter (melted) about 4 sticks
  • 6 pcs eggs
  • 4 cups flour
  • 3/4 cup milk
  • 1 tsp vanilla extract


poundcake

directions:

  1. combine the melted butter and sugar in a large bowl and mix well
  2. add the eggs one by one and keep mixing
  3. add a cup of flour then add some milk and combine
  4. repeat the process of number 3 until you use all the remaining flour and milk
  5. add the vanilla and keep mixing until well combined
  6. bake to 300F for 1 hour and 40 minutes
  7. and you're done!

i hope you will enjoy this recipe! eat it alone, or you can use the cake as a cheesecake crust instead of graham crackers (which i will show you in my next video), or you can use the cake when you make tiramisu! there is so much you use the pound cake is for! :)

happy baking!


cake

love you bunches,

sai

japanese condensed milk bread

today, i will be sharing with you this delicious japanese condensed milk bread that i've been obsessing with! this whole quarantine life definitely gave me so much time to invent and play around with my baking skills! most of the time my inventions flops, but once in a while i get really good results. just like this recipe that i'm about to share with you guys!


dough

ingredients:

for the dough

  • 1 tsp sugar
  • 1 tsp yeast
  • 2/3 cup milk
  • 1 1/2 cups flour
  • 2 tsp sugar
  • 1/2 tsp salt
  • 2 tbsp condensed milk
  • 4 tbsp butter
  • extra flour if needed

for the filling

  • 2 tbsp butter
  • 2 tbsp condensed milk


milkbread

directions:

  1. in a bowl, warm up the milk in the microwave (110F to 115F) hot milk will kill the yeast
  2. combine the 1 tsp sugar and 1 tsp yeast into the warm milk and mix well. set aside
  3. into a different bowl, combine the flour, sugar, salt, condensed milk, butter and the yeast mixture. mix well
  4. start kneading until well mixed. the dough should be soft and smooth. add more flour if needed.
  5. form the dough into a ball and cover. let the dough rise until doubled in size. about an hour or two
  6. for the filling, combine the butter and condensed milk together
  7. once the dough is ready, flatten the dough into a square form
  8. cut the dough into long strips using a knife or a pizza dough cutter
  9. spread the filling on top of the sliced dough
  10. stack the dough together and cut the dough into pieces
  11. move the small pieces dough into a prepared baking pan and let the dough rise again for another hour
  12. bake the dough to 325 for 20 minutes
  13. after 20 minutes turn the oven temperature down to 300F and bake for another 10 minutes
  14. and the bread is ready to be eaten!


milk bread

enjoy! hope that everyone is staying safe! happy baking!

love you bunches!

sai

kimchi recipe

today, i will share with you guys my husband's favorite kimchi recipe. i hope you enjoy making it!

ingredients:

  • 1 whole napa cabbage (about 8 pounds)
  • 6 pcs scallions
  • 2 tsp ginger (grated)
  • 1.2 oz garlic (grated)
  • 2 tbsp shrimp paste
  • 1/2 cup sea salt
  • water (enough to cover the cabbage)
  • 5 tbsp gochugaru
  • 2 tsp sugar

directions:

  1. cut the cabbage lengthwise into quarters, and cut out the center. then cut each quarter approximately every 2-inches to make strips.
  2. mix the cabbage and salt in a large bowl. using your hands, mix the salt and cabbage together until it softens a bit. you can use gloves, but bare hands are also fine.  then add just enough water to cover the cabbage and let it sit for 1 to 2 hours.
  3. while waiting, go ahead and make the paste. combine the garlic, ginger, sugar and the shrimp paste into a bowl, add the gochugaru, and mix well. you can add more or less gochugaru depending on how spicy you want your kimchi to be.
  4. drain the cabbage, add more water, and then drain it again 3 times to rinse the cabbage.  let it sit in a strainer and continue to drain for 15 to 20 minutes, ensuring that you drain as much water as you can.
  5. once drained, add the rest of the vegetables and the paste and then mix well. make sure every cabbage is coated thoroughly.  you can again use your hands to mix, but this time gloves are recommended as the paste can stain your skin and cause it to burn if you touch your eyes.
  6. move the kimchi into jars and push down gently, ensuring that the brine covers the vegetables. make sure to leave at least 1 to 2 inches of space on top as the kimchi will expand during fermentation.
  7. you can eat the kimchi right away, but depending on how sour/fresh you like it, let the kimchi jar stand in the room temperature for 2 to 4 days, release the pressure by opening the jar (carefully!) at least once a day.
  8. refrigerate and dig in!

i hope you enjoy this recipe! if you do, please share and don't forget to send us photos via our facebook page or instagram! see you again in my next recipe!

xo,
S

biscoff cookie butter cheesecake recipe

hey riders!

in this episode, let's make a biscoff cookie butter cheesecake! i have biscoff cookie butter that has been hiding in my pantry for quite a while, and i decided to do something with it before it expires. so i thought, maybe a cheesecake would be good, and the outcome? well, it's for you to figure out when you try to make this recipe. one thing for sure, husband and friends loved it! :) GOOD LUCK!


biscoff cheesecake


INGREDIENTS:

  • 2 cups graham crackers crumbs
  • 6 tablespoon melted butter
  • 1 block cream cheese (250 grams)
  • 1 cup sugar
  • 1 cup biscoff cookie butter
  • 1 egg
  • 1 teaspoon salt
  • 1 teaspoon vanilla extract
  • 1/2 cup sour cream


cheesecake


DIRECTIONS:

  1. into a bowl, combine graham cracker crumbs and melted butter and combine well
  2. pour the graham mixture into a prepared pan and pressed down firmly then bake to 350F for 8 to 10 minutes, make sure to cool down completely
  3. meanwhile, add cream cheese and sugar into a bowl and combine well
  4. then add the biscoff cookie butter and mix well
  5. add salt. mix well
  6. add the vanilla extract, egg and sour cream and mix well
  7. pour the mixture into a completely cooled down graham crumbs and bake to 350F for 30 - 40 minutes
  8. take the cake out of the oven and let it cool down
  9. the middle of the cake would be a little runny but that is completely natural
  10. ENJOY!


butter


let me know if you try this recipe! it is so so good! :)

thank you all so much and i'll talk to you soon!

love you bunches

sai